
Thunderbird 3 Set up
Estimated Reading Time: 2 Minutes-
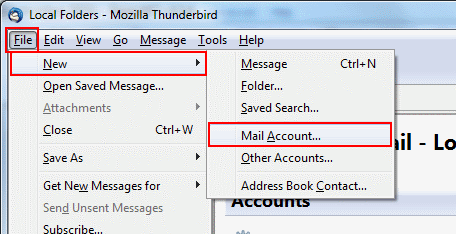
If this is the first time you’ve opened Thunderbird, the Mail Account Setup window will appear automatically (continue to step 2). Otherwise, go to File on the top bar and select Mail Account.
For newer version, see this guide.
2. Fill in your name, email address and password.
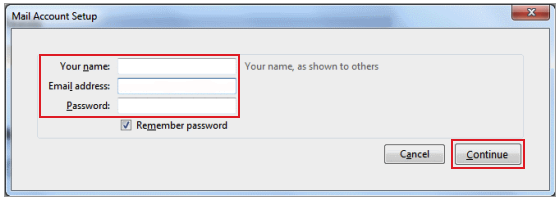
• Your Name: Enter your full name (or the name you’d like people to see when you send them email from this account).
• Email Address: Enter the SpinTel email address you’re setting up.
• Password: Enter the password for the email address you’re setting up.
Then click on Continue.
3. Now Thunderbird will try to detect your mail settings. For manual configuration, apply the settings of your preferred incoming email server type (POP or IMAP).
Tip: We recommend using IMAP, especially if you access your email from multiple devices (such as a phone, tablet, or computer). IMAP keeps your emails synchronised across all your devices.
| Setting | IMAP | POP |
| Incoming Mail Server | imap.spintel.net.au | pop3.spintel.net.au |
| Incoming Port | 993 (SSL/TLS) Alternative: 143 (STARTTLS/TLS if supported) |
995 (SSL/TLS) Alternative: 110 (Unencrypted - Not Recommended) |
| Outgoing Mail Server (SMTP) | smtp.spintel.net.au | smtp.spintel.net.au |
| Outgoing Port | 587 (STARTTLS/TLS) Alternative: 465 (SSL/TLS) |
587 (STARTTLS/TLS) Alternative: 465 (SSL/TLS) |
| Outgoing Server Authentication | Enabled | Enabled |
| Username | Your SpinTel email username (the part before @spin.net.au) | Your SpinTel email username (the part before @spin.net.au) |
| Password | Your SpinTel email password | Your SpinTel email password |
If you're changing an existing email account from POP to IMAP or from IMAP to POP, we recommend backing up any important emails before making the change. This helps prevent accidental data loss, as some email applications store emails differently depending on the account type.
When you’ve finished, click on Re-test Configuration.
4. Thunderbird will take a minute to check the settings you’ve entered.
• If your settings are correct, it’ll say The following settings were found by trying common server names or Thunderbird has found the settings for your account. Click on Create Account and move to the next step
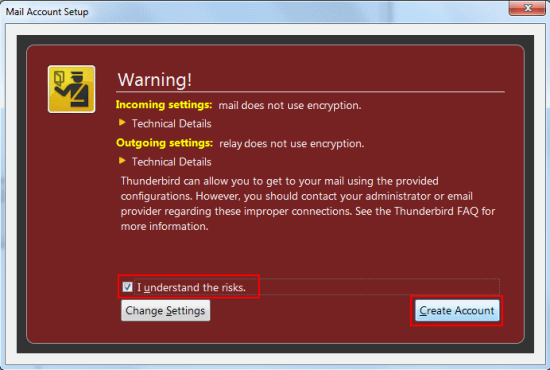
5. You’ll see a warning screen like the one below. To continue, you’ll need to tick the I understand the risks checkbox and click Create Account.
6. That’s everything you need to do. Click OK again to finish. Click Get Mail, and your email will be downloaded to your Inbox.
Congratulations, you have successfully set up your email address.