
How to Fix eSIM Installation Issues
Estimated Reading Time: 6 MinutesExplore the common eSIM installation errors below and follow the recommended troubleshooting steps to resolve them.
QR Code not working
If your eSIM QR code does not scan using your phone's camera:
- Make sure the QR code is clear and fully visible on another device or screen.
- Try scanning the QR code using another compatible scanner, such as Google Lens.
- If the QR code still doesn't work, try installing your eSIM manually.
For manual installation instructions, refer to: How to Activate and Set Up eSIM.
If you're still unable to install your eSIM, please Contact us for assistance.
"Unable to Activate eSIM" Error
If you receive an "Unable to Activate eSIM" message during installation, follow the steps below.
1. Check your internet connection
Your phone needs a stable internet connection to download and install the eSIM.
- Connect your phone to a strong and stable Wi-Fi network.
- If you're already connected to Wi-Fi, try disconnecting and reconnecting before attempting the installation again.
2. Restart your phone
Restart your phone and then try installing the eSIM again. This can resolve temporary network or software issues that may prevent activation.
3. Check whether the eSIM is already installed
Before scanning the QR code again, check whether the eSIM has already been added to your phone.
On an iPhone:
- Go to Settings > Cellular or Settings > Mobile Service/Mobile Data.
- Look for an additional SIM/eSIM. It may be labelled Personal, Secondary, Travel, or another name.
- Select the eSIM and make sure Turn On This Line is enabled.
On Android:
- Open Settings.
- Go to Connections, Network & Internet, or SIMs/Mobile Network.
- Select SIM Manager or SIMs.
- Look for the SpinTel eSIM or an additional eSIM/mobile plan.
- If the eSIM is listed, make sure it is turned on/enabled.
Samsung:
Settings > Connections > SIM Manager
Google Pixel:
Settings > Network & Internet > SIMs
If the eSIM is already installed, do not scan the QR code again.
4. Remove unused eSIMs
If you have several old or unused eSIM profiles stored on your phone, remove any that you no longer require.
Important: Do not delete an eSIM that is currently active or that you may still need.
5. Try manual eSIM installation
If the QR code installation continues to fail, try installing the eSIM manually.
Refer to How to Activate and Set Up eSIM for step-by-step instructions.
6. Check that your phone is network unlocked
A phone that is locked to another mobile provider may prevent a SpinTel eSIM from activating.
On an iPhone:
- Go to Settings > General > About.
- Find Carrier Lock.
- It should display No SIM restrictions.
Unlike iPhones, many Android phones do not provide a reliable setting that clearly shows whether the device is network locked.
On Android:
- Go to Settings > Connections > SIM Manager or Settings > Network & Internet > SIMs.
- Check whether the phone allows you to add or use a SIM/eSIM from another mobile provider.
- If you purchased the phone from another mobile provider and are unsure whether it is network locked, contact that provider to confirm.
If your phone is locked, contact the provider that supplied the phone to discuss unlocking it.
7. Temporarily disable VPNs
A VPN or certain device management settings may interfere with the eSIM installation.
- Temporarily turn off any active VPN and try installing the eSIM again.
- On an iPhone, you can check for device management profiles under Settings > General > VPN & Device Management.
Do not remove a work, school, or other managed device profile unless you know it is safe to do so.
Still Unable to Activate Your eSIM?
If you've completed the steps above and still receive an "Unable to Activate eSIM" error, do not repeatedly scan the QR code or delete the eSIM profile.
Please contact our support team so we can check your service and eSIM activation status and provide further assistance.
"eSIM Cannot Be Added - This code is no longer valid" Error
The message "This code is no longer valid" typically indicates that the QR code you’re attempting to scan for eSIM installation has already been utilised or has expired, assuming you’ve correctly scanned it.
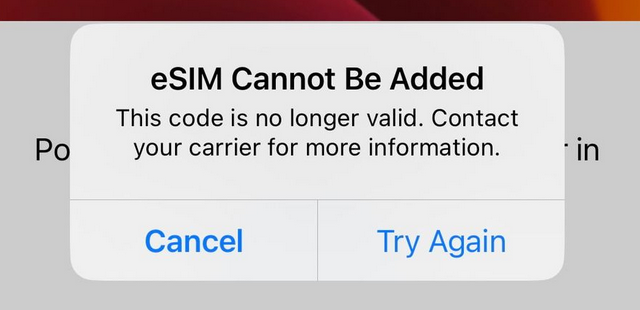
iOS 15 and below might display a slightly different message like "Cellular Plan Cannot Be Added".
Understand that most QR codes can only be used once. Even if you stop eSIM activation midway, the QR code will likely become unusable. This is done for security to prevent unauthorized use or duplication of the same eSIM profile.
Contact us for assistance in obtaining a new QR code.
"Cellular Plans from This Carrier Cannot Be Added" Error
If you encounter the mentioned message and cannot install an eSIM (or add a Cellular Plan), it often indicates that your iPhone (or iPad) could be locked to a specific carrier.
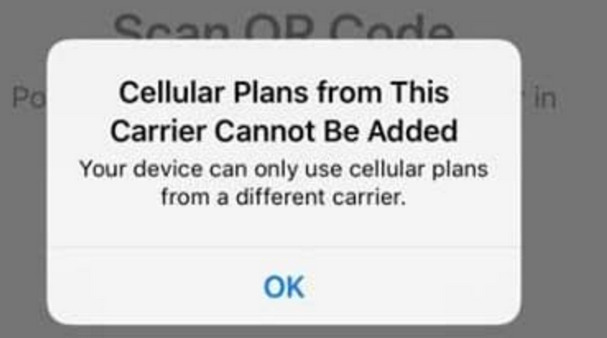
Here are the steps to determine whether your iPhone is locked:
-
Open your iPhone’s Settings.
-
Select "General."
-
Tap on "About."
-
Scroll down to the "Carrier Lock" section. If it displays a message such as "No SIM restrictions," it typically means the device is unlocked. If you see any other message, it could be locked to a specific carrier.
Please note that this method applies to devices running iOS 14 or later.
Unable to Continue Cellular Configuration
This error message is linked to installation problems, which can be triggered by various factors, such as:
-
The device has an excessive number of eSIMs installed - If your device’s eSIM storage is full, simply delete your old eSIMs.
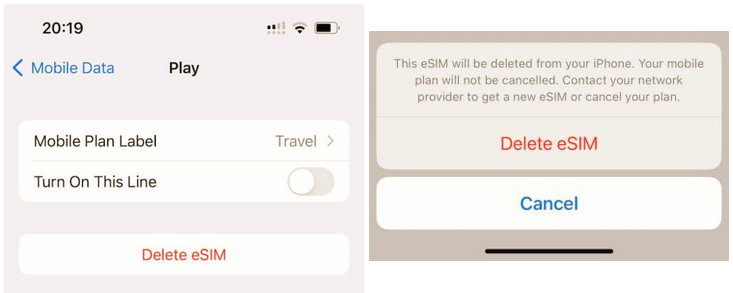
-
Cellular/Mobile data is disabled in the device’s settings
-
Attempting to install an eSIM that has already been installed: Most eSIMs can only be installed once.
-
Weak or unreliable connection during eSIM installation.
How to Fix ’Unable to Complete Cellular Plan Change’ Error
Restart Your Device
Restarting your device can often fix small issues, like the "Unable to Complete Cellular Plan Change" error. Just turn off your device, wait a few minutes, then turn it back on. Then, try the eSIM installation again.
Check for System Updates
Make sure your device’s operating system is up to date. Old versions may not work well with current cellular services. Go to your device’s settings, find system updates, and install any available ones.
Signal Strength
Network issues can occasionally obstruct modifications to your cellular plan. Confirm that your device has a strong signal, and if it’s weak, consider moving to an area with better reception.
Airplane Mode
To refresh your connection, turn the Airplane Mode switch on and off.
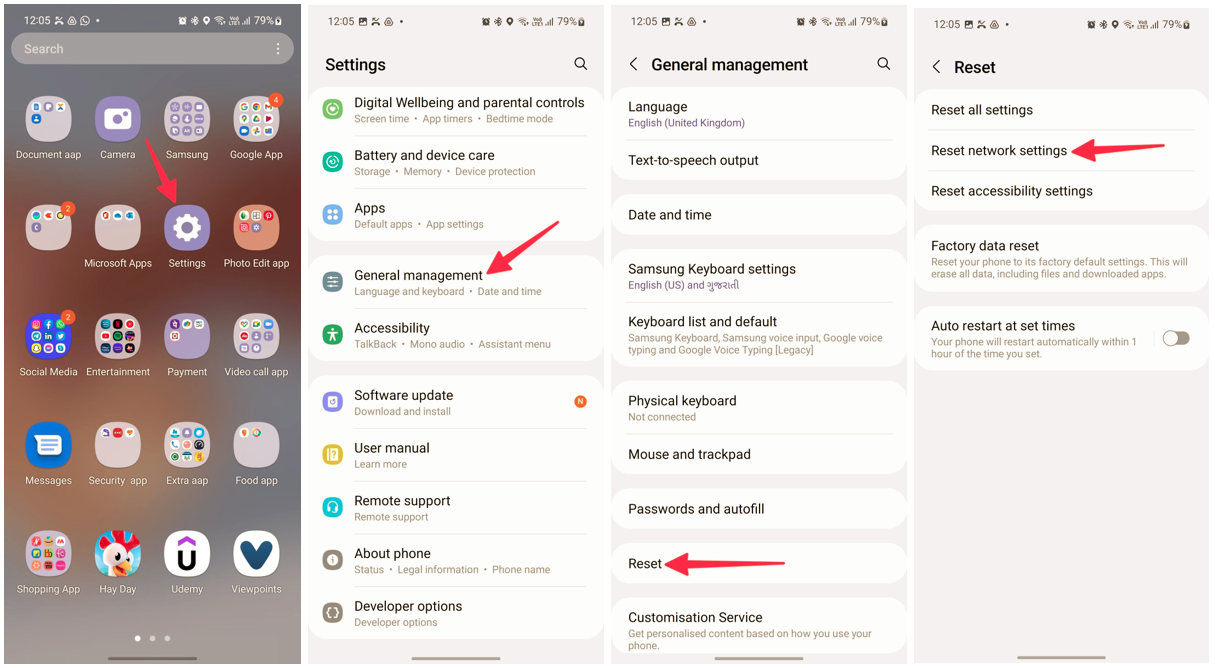
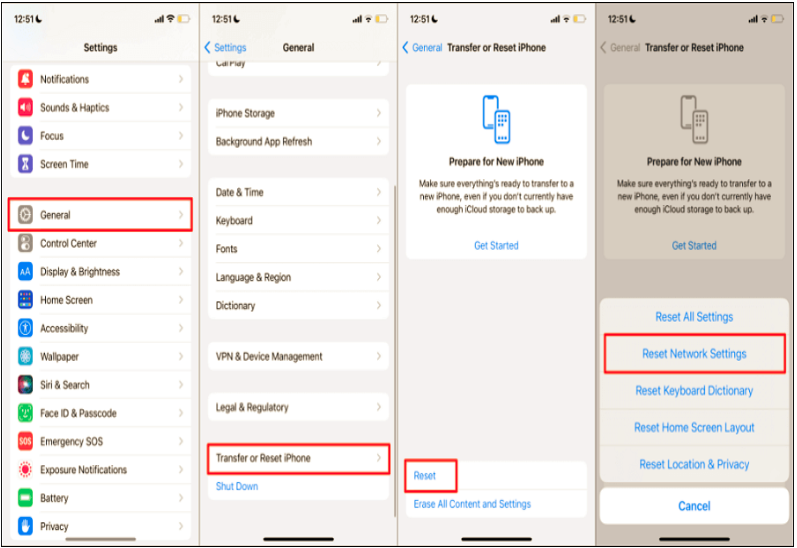
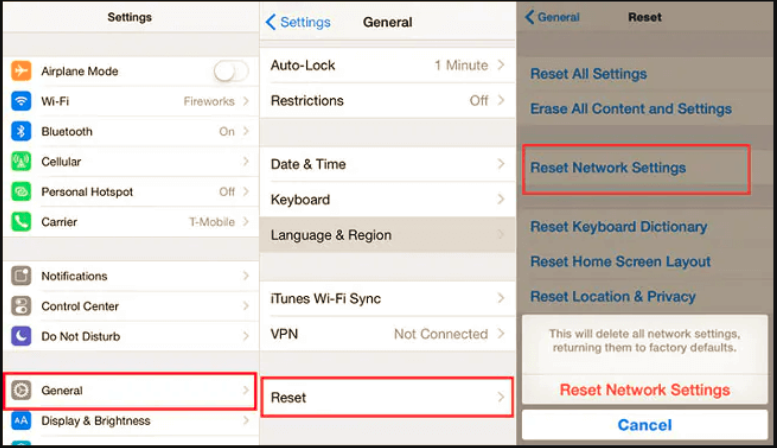
Reset Network Settings
1. For Android, launch the Settings app (the one with a gear icon) > scroll down and tap System.
2. Select Reset options > Reset Wi-Fi, mobile and Bluetooth > Reset settings
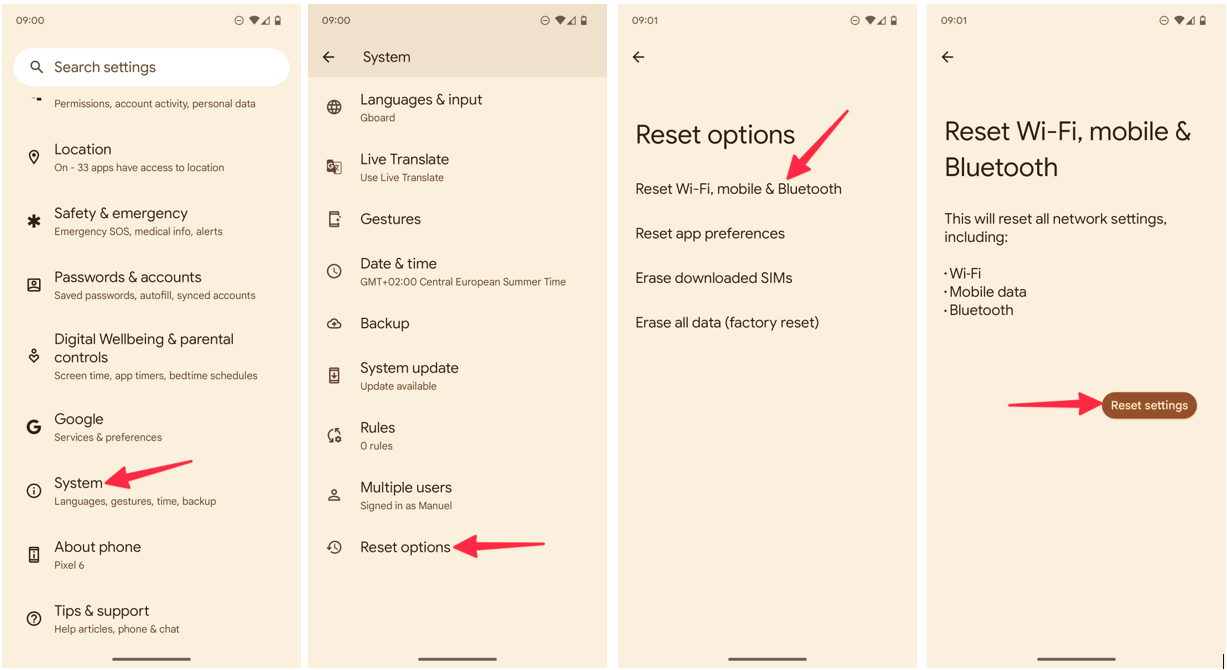
For Samsung Galaxy phone or tablet:
For iOS or iPadOS 15 or later, tap Settings > General > Transfer or Reset [Device] > Reset > Reset Network Settings.
For iOS or iPadOS 14 or earlier, tap Settings > General > Reset > Reset Network Settings.
If you've followed the steps above and the issue persists, our support team is here for you.