
Using VoIP Services on a Locked Modem
Estimated Reading Time: 3 MinutesSome Internet Service Providers (ISPs) “lock” the VoIP features of their supplied modems. This means you can’t directly change the VoIP settings inside the modem’s interface.
Good news: You can still enjoy VoIP calls by connecting your VoIP-capable equipment alongside the modem.
There are two main ways to do this:
-
Analog Telephone Adapter (ATA) – lets you use a standard analog phone.
-
VoIP-Enabled Telephone – connects directly to your network and stores VoIP settings.
This guide will show you step-by-step how to set up both methods.
Option 1: Using an Analog Telephone Adapter (ATA)
What You’ll Need
-
A modem with a working internet connection
-
An ATA device
-
An analog phone (standard landline-style or a VOIP-compatible handset)
-
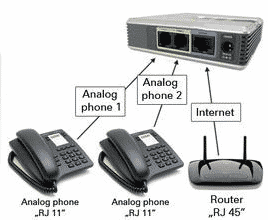
An Ethernet cable (RJ45) and phone cable (RJ11)
-
Your VoIP account details (username, password, SIP server address)
Step 1: Power Off Your Equipment
Turn off your modem, ATA, and phone to avoid connection issues during setup.
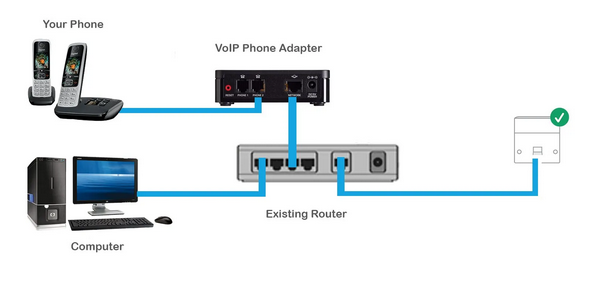
Step 2: Connect the ATA to Your Modem
- Plug one end of the Ethernet cable into the ATA’s WAN or Internet port.
- Plug the other end into an available LAN port on your modem/router.
Step 3: Connect Your Phone to the ATA
Attach the phone cable from your analog phone to the ATA’s Phone or Line port.
Step 4: Power On Devices
- First, turn on your modem and wait until the connection is established.
- Then power on the ATA.
- Finally, plug in and power your phone (if applicable).
Step 5: Configure the ATA
- On a connected computer, access the ATA’s configuration page (refer to your ATA manual for the correct IP address or login method).
- Enter your VoIP SIP settings: server address, username, and password. For details, see this article.
- Save your changes.
Step 6: Test the Line
- Pick up your phone and check for a dial tone.
- Try placing a test call to confirm audio quality.
Option 2: Using a VoIP-Enabled Analog Phone
Some analog-style phones come with built-in VoIP functionality, letting you skip the ATA entirely.
What You’ll Need
-
A modem with a working internet connection
-
A VOIP-compatible telephone
-
An Ethernet cable (RJ45)
-
Your VoIP account details (username, password, SIP server info)
Step 1: Connect the phone to your modem/router via Ethernet.
Step 2: On a connected computer, access the phone’s configuration page (refer to the manufacturer's manual for the correct IP address or login method).
Step 3: Enter your VoIP SIP settings: server address, username, and password. For details, see this article.
Step 4: Save your changes.
Step 5: Test for dial tone and call quality.
Troubleshooting Tips
-
No Dial Tone: Double-check all cable connections and verify ATA power.
-
Registration Failed: Ensure your SIP credentials are entered correctly.
Need Assistance? We're Here to Help!
If you need any further guidance or have questions about your options, our support team is ready to assist you.
📞 Call us: 1300 303 375 – Speak with one of our representatives for real-time support.
💬 Chat with us: Click on the chat icon on our website to connect with our team instantly.